AmpliPro User Interface Guide: Mastering Your Home Audio Controller
AmpliPro offers seamless control through both a web app and mobile apps for Android and iOS. This comprehensive guide will walk you through every aspect of operating your AmpliPro, ensuring you can make the most of your home audio system.
Is video more your style? Checkout our video walkthrough of the AmpliPro instead.
Navigating the home menu
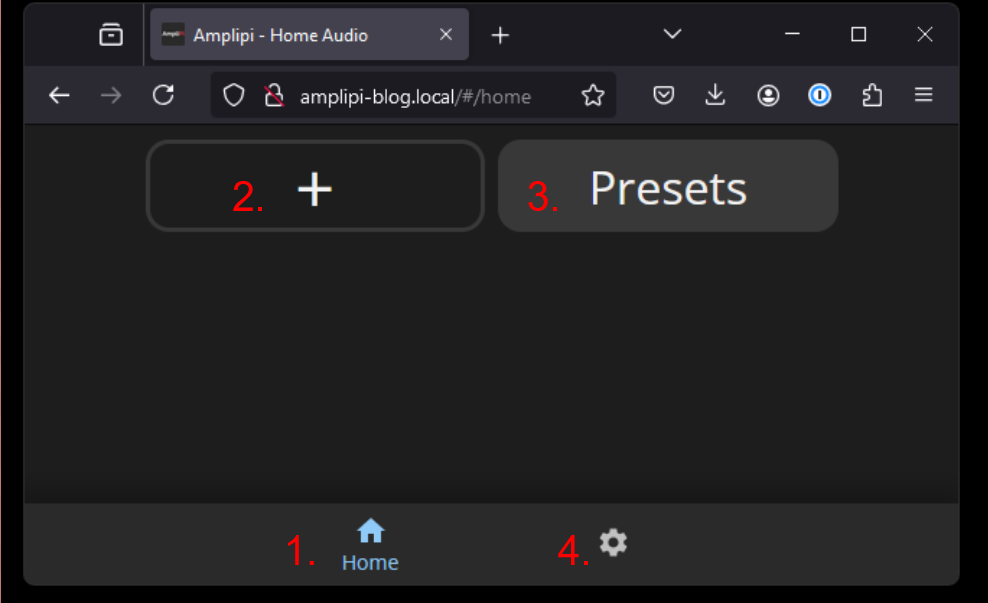

1. Home
This is your starting point. The home screen displays all your currently active streams, allowing you to play/pause, adjust volume, and manage your audio experience. The AmpliPro system can support up to 4 active streams running simultaneously. If you have 4 active streams, the plus sign will no longer be visible on the home screen. To deactivate an active stream, click the X in the top right corner of the stream on the home screen.
2. Select Stream (+)
Here, you can choose from your existing streams, activate them and assign them to specific zones or groups.
3. Presets
Presets let you effortlessly switch between your saved audio setups with just one click.
For instance: you could create a preset named “House Party” that sets every zone in your home to play your 80’s music Pandora station at 75% volume.
House Party, Dinner Party, Game Day, Sunday Morning, Getting Ready. These are some ideas for different presets you can create.
You could have a large variety of presets for whatever mode your in the mood for.
4. Settings
The settings menu includes all the configuration options for your AmpliPro system, such as Streams, Zones, Groups, Presets, Configuration, Admin Panel, and links to support documents.
5. Player
This button appears when an active stream is selected. The player tab views details about the currently active stream. Fine tune your listening experience here by adjusting individual zone volumes within a group, and managing the audio stream (play, pause, next song, etc.)
Settings: complete control of the AmpliPro system

Streams
Click on “Streams” to see all the existing streams configured on your AmpliPro. To create a new stream, click the + button. To edit an existing stream, simply select it from the list. Each stream type is represented by a unique icon. Some types correspond to physical inputs, like RCA or 3.5mm AUX, while others represent digital audio from online sources like Pandora, Spotify, or Internet Radio. Additionally, some stream types come from third-party hardware that can be connected to your AmpliPro, such as Bluetooth or FM radio. We will explain each stream type in detail later in this post. You can edit your inputs, if for example the TV is connected to input 4 you can rename the input to “TV”
Zones
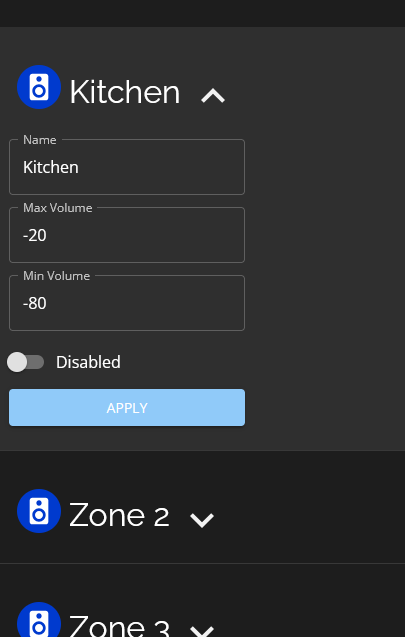
The Zones section allows you to personalize your audio setup in two key ways:
Zone Renaming You can assign custom names to your zones for easier identification. For instance, “Zone 3” could become “Kitchen” or “Living Room.”
Zone Level Volume Range Control This feature lets you set minimum and maximum volume levels for each zone. For example, you might set the kitchen’s volume range from -80 (min) to -40 (max).
The volume limiting feature is particularly useful when you’re using grouped zones. For example: If you’ve grouped all zones for a house party and someone increases the volume for the entire house, zones with a set maximum (like the kitchen at -40) won’t exceed that level, ensuring they don’t blast at full volume. This creates a more controlled and comfortable audio experience throughout your home.
Zone-level volume control can be used to balance multiple zones that reside in a common area. For instance, if some speakers are positioned higher or need more power, you can adjust their minimum and maximum volumes to be higher than those of other zones in the group, creating a built-in volume offset.
Just a quick note on volume levels: on your AmpliPro, volume is measured in -dB. Setting the volume to 0dB means no attenuation, allowing music to play at the loudest level. Conversely, setting the volume to 80dB applies maximum attenuation, resulting in the quietest playback.
Groups

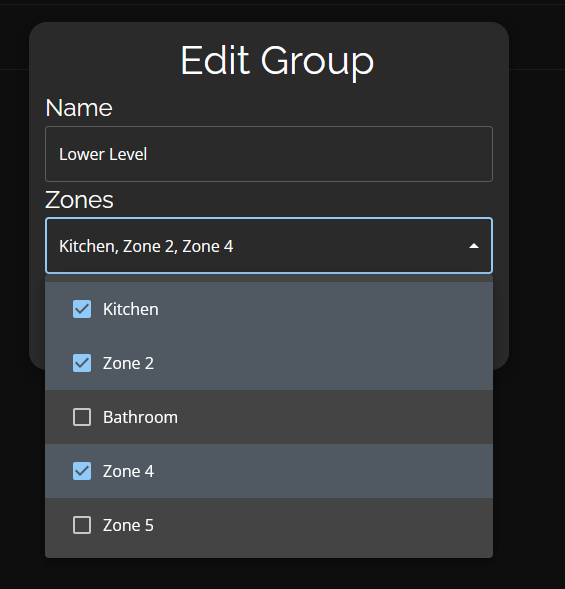
This feature allows you to group zones together for multizone control.
Example Setup:
-
Lower Level: Zones 1, 2, and 4 (e.g., living room, kitchen, dining room)
-
Upper Level: Zones 3, 5, and 6 (e.g., bedrooms, office)
-
Whole House: All zones combined
. Groups allow for you to control your home audio more seemlessly with fewer clicks.Note: a zone can belong to more than one group.
Presets
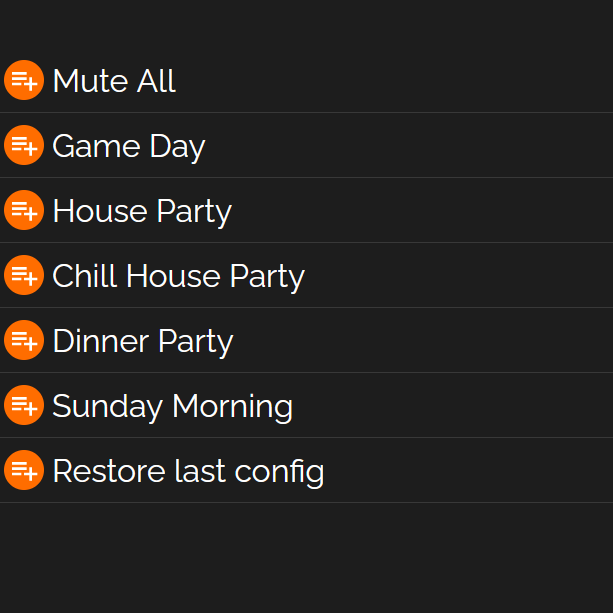
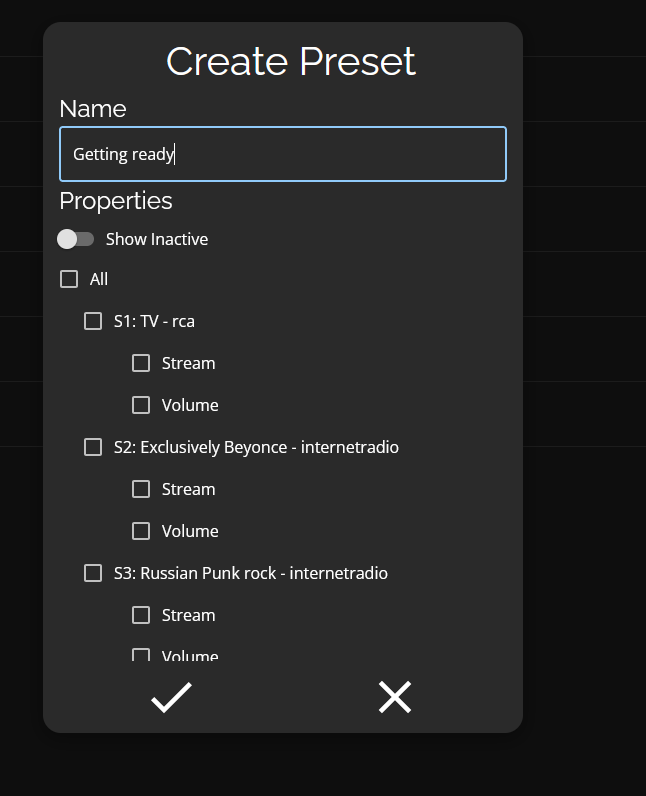
What is a preset? It’s whatever audio state your AmpliPro is currently playing: ( Streams + Zone/Groups + Volumes. ) When you save a preset it captures the current state of ( Streams + Zone/Groups + Volumes. ) This allows for you to switch back to that preset whenever you like with just one click.
For example, you want to create a preset for getting ready to head out for the night. Let’s call it “Getting Ready”:
- On the Home page, set up your streams, zones/groups, and volumes to what you want them to be. Do you want higher volumes, or all the zones playing the same or different streams? Set all of that up.
- Then click to Settings->Presets, hit the plus button at the bottom of the page, name and save your preset. You can set up any number of presets you wish.
- Then back on the Home Page, click the presets button to switch between your saved presets. This is another feature that greatly reduces your need to click around and gives you more control over the AmpliPro.
Configuration
All AmpliPro settings (including stream, zone, and group configurations) are stored in a configuration file. In the config menu, you can download the current configuration file or upload a previously saved one.
Upload: Here you can upload your previously saved configs from your device. (computer, phone, etc.)
Download: Here you can download your current config to your device (computer, phone,etc)
Factory: To restore the AmpliPro system to its factory default configuration, click the reset button. After confirming, the current system configuration will be erased and reset to the defaults. Make sure to save your current configuration before proceeding with this action.
LMS: Your AmpliPro can be operated in a special mode refered to as LMS mode. When LMS mode is enabled, the configuration of the AmpliPro is rewritten and a new configuration file is loaded. In this mode of operation, the AmpliPro will have 4 active LMS clients running. It will also start up an LMS server. This mode is specifically made to work with third party integrations such as this nice driver from Innovo.
Hardware Reset: Resets the preamp hardware and controller software (does not reboot the Raspberry Pi-based controller)
Hardware Reboot: Reboots the Raspberry Pi-based controller
Hardware Shutdown: Triggers a shutdown of the embedded linux controller
Admin Panel
Latest: This has the latest releases. Plus it details information about the latest releases. If your system is not up to date there should be an “update” button to click here. Otherwise it should just say: “Your system is up to date”
Older: This has all the older releases and prereleases. If you need to revert back to an earlier version, this is where you can do it.
Custom: The AmpliPi software is open source and this is where you can upload a custom release.
Support Tunnel: This generates a key which allows the engineers here at Micronova to remotely access your AmpliPro. From here we can troubleshoot and diagnose any potential problems. More details on this in the “Troubleshooting” section below. See our Support Tunnel blog post
Admin Settings: This tab has three features: Before version 0.4.5 Admin Settings is called “Updates”
- Password: Set and change a password to log into your AmpliPro. The password can be whatever you want, even a single character. To remove the password click the update password button with nothing populating the password fields.
- Persist Logs: This will be a rare use case. If an AmpliPro has an issue, it’s acting buggy or something is not correct about it, you can enable this feature for us to look at the logs and see what the device is doing. It can help pinpoint where in the code a bug may exist. Without this feature enabled, when the device is rebooted the logs are lost. This feature will be used in conjunction with AmpliPro support during situations where there is a persistent problem. This should not be used long term as it will use up all of the available disk space.
- Auto Off Delay: This will automatically turn off the persist log enabling within the number of days populated in this field. It is possible to not have automatic deactivation if you set the value to zero, but this is not recommended.
About
This page displays what version of software and firmware you’re running.
It also has the following links:
AmpliPro: https://www.amplipro.com/
Micronova: https://www.micro-nova.com/
API: https://api.amplipi.com/#overview
Github https://github.com/micro-nova/AmpliPi
Discourse: https://amplipi.discourse.group/
License https://github.com/micro-nova/AmpliPi/blob/main/COPYING
Your AmpliPro’s logs. (http://{ Device IP }:19531/entries) This is sometimes useful if there is any troubleshooting needed for your device. See troubleshooting below.
Creating New Streams
Next, we will describe the process for creating and configuring new streams. Note that there is no limit on the amount of each type of stream that can be created. For many use cases, you will need to create multiple streams of the same type. For example, if you wish to listen to two different Pandora streams at once, you will need to create and configure two separate Pandora streams.
Airplay & Airplay2
- Name the Airplay stream: This is the name of the device that will appear in the list of AirPlay devices when choosing where to stream audio from your iOS device.
- Select whether or not you would like Airplay 2 or not.
- Back on the home menu, add an active stream of the Airplay selection you just created. Then from your iOS device connect to the Airplay stream.
Note: AirPlay 2 enables synchronized streaming from one source to multiple devices. For instance, you can stream music to your AmpliPro system and other wireless speakers simultaneously and in sync using AirPlay 2. Please note that the AmpliPro system only supports one active AirPlay 2 stream at a time.
DLNA / UPNP Renderer
- Add a DLNA stream and give it a name
- From the home menu, select the DLNA stream you just created. Then use an app such as BubbleUPNP on Android to play music to it.
FM Radio Station
For FM radio you will need a USB FM antenna. Here’s an Amazon link to what we use in the office.
- If a new USB device is plugged in to the AmpliPro, the unit will need to restart to detect it.
- From the ‘select stream type’ menu. Add “FM Radio Station”
- In the corresponding fields, name the station and enter an FM frequency 87.5 to 107.9.
- Optional: The default built-in logo is: static/imgs/fmradio.png. If you wish to change the logo to a local radio station’s logo or something else, Enter the URL of the image you wish to use in the ‘Station Logo’ field.
Note: The AmmpliPro can only support one FM stream at a time.
Internet Radios Station
To create internet radio stations we search from radio-browser.info It’s a fantastic resource for internet radio. To quote them from their website:
“What is radio-browser? This is a community driven effort (like wikipedia) with the aim of collecting as many internet radio and TV stations as possible. Any help is appreciated!” From this reasource there are huge quantity of stations to choose from.
To create an internet radio station stream:
- Type something in the search bar. If I search “punk” the top result is Russian Punk rock.
- Then select it and the rest of the fields auto populate with the station parameters (the name and URL.) You can edit the name if you wish to as well.
- Play around with this feature and find the stations you like. You can also browse stations from your phone or desktop at radio-browser.info.
- The trash can button will delete the selected station from your list.
LMS Client and LMS Mode
Lyrion Music Server (formerly Logitech Media Server) is open-source server software. Lyrion can stream your local music collection, internet radio stations, and content from many streaming services (with and without subscriptions). For more information, visit Lyrion’s website.
See our blog post on using the AmpliPro in LMS mode for third part integrations such as Nice
The AmpliPro can both play streams from other Lyrion servers and function as a Lyrion server itself.
How to play a stream from another LMS:
- From the “Add Stream” page, select “Add LMS Client”
- Optional: Enter the IP address of the server. If left blank it will attempt to discover a server on the network
- Input the LMS server port (optional, defaults to 9000 if not specified)
- Name your stream (this name will appear in your LMS media player for selection)
- Return to the home page and play your LMS stream
To turn your AmpliPro into an LMS:
- Go to the Configuration page
- Toggle on LMS mode. This will automatically download your current configuration to be reuploaded later. When LMS is activated it automatically creates 4 streams, one for each source.
- Access the LMS interface at amplipi.local:9000 From here, you can use the media server.
Note: LMS has plugins for many different audio types. Go to the server->settings-> Manage Plugins to change which audio types are enabled. Here’s a link to Lyrion’s plugins page There are also apps for both iOS and Android you can use to control playback on each of the LMS streams. Listed under the “Software based players” at Lyrion’s Players and Controllers
Pandora Station
- With your Pandora log in credentials you can link your Pandora account to your device here.
- Type in the name of the Pandora stream you would like. This name can be anything - it will be used to select this stream from the source selection dropdown
- Optional. Populate Station ID: If you don’t populate station ID, Pandora will play a generic “account radio” based on prior listening data. If you do want to populate it here’s how: Station ID is the numeric section of a specific Pandora station link. Example: ID = 4610303469018478727 from https://www.pandora.com/station/play/4610303469018478727.
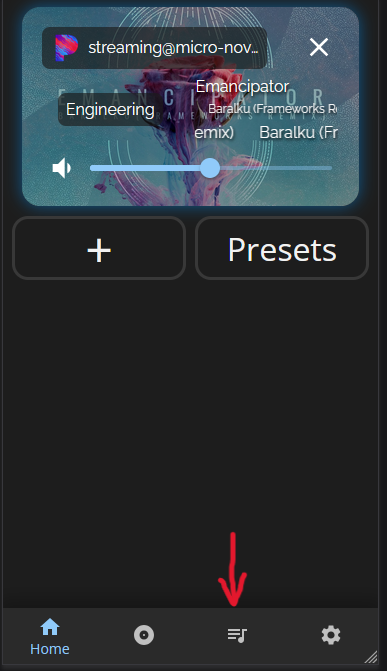
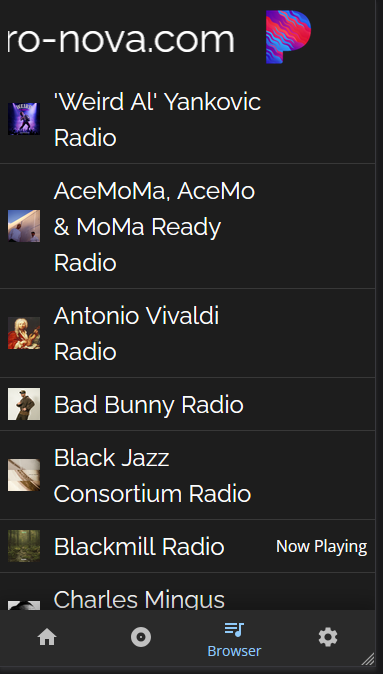
- Select and switch between your Pandora account’s stations by selecting the music menu button at the bottom of the home screen when a pandroa stream is selected. From there all your stations are listed. See pictures below.
File Player
This will play audio from websites or your own computer.
- URL: Enter the url of the file to play. Example: https://www.nasa.gov/wp-content/uploads/2015/01/640150main_Go20at20Throttle20Up.mp3
- Name: This name can be anything - it will be used to select this stream from the source selection dropdown
Spotify Connect
You can create multiple stream setups and play to them as long as you’re on the same internet connection.
- First, select Spotify Device
- Name the stream: Let’s name our first one SpotiCry
- Lets make 3 more: SpotiSmile, SpotiAnger and Synthify
- Now let’s add a streams to a zone. SpotiCry on Zone 1
- Open Spotify on your phone or device and play some music. Then select the device you would like to play it to. All 4 streams should appear. SpotiCry, SpotiSmile, SpotiAnger and Synthify. Currently you only have Zone 1 attached to SpotiCry. Select it and you should be good to go. Another phone/spotify account connected to the wifi in the house lets say they want music in zone 2. Add a stream for zone 2, select SpotiSmile. They can do the same, selecting the corresponding spotify stream and play the music they want.
Media Device
You will need a USB storage device with audio to play for this option.
- Whenever a USB device is plugged in to the AmpliPro, the unit will need to restart to detect it.
- From the add streams, select “Media device” and name it
- From the home page add the media device stream. After you’ve done this a new icon should pop up on the bottom of the home screen \
- Click the new icon, and from here you can navigate and play the files stored on the USB device.

Manuals and Troubleshooting
If you do have any issues with your software or hardware don’t hesitate to reach out to us via email.
Search for past conversations or contribute your own to the AmpliPi discussion forums
Link to our AmpliPro FAQ.
Link to the Main Unit Manual
Link to the Streamer Unit Manual
Error Codes Definined
The following numerical codes are displayed on the AmpliPro’s E-Ink Display on newer models, or on the TFT Display on older models, when the corresponding error occurs:
0: E-Ink Display service is running, but the AmpliPi service itself is not
1: Failed to get the IP address for the AmpliPi
10: Cannot connnect to REST API
11: Time out when connecting to REST API
12: Invalid response from REST API
13: Other REST API Error
14: Error Getting Status From File/Another Process
15: Unable to find serial number (Some AmpliPro devices do not have EEPROM boards and therefore do not have internal serial numbers, but these do not have E-Ink Displays)
16: Unable to get number of expander units due to Exception
17: Unable to get number of expander units from API
Conclusion
Hopefully with the help of this guide for the web and mobile interfaces, you can quickly learn how to easily control multiple zones, create custom groups, set up various audio streams, and save presets for different scenarios. From setting up Internet radio stations and integrating with popular services like Spotify and Pandora to fine-tuning your audio zones and creating the perfect ambiance for any occasion, the AmpliPro puts you in complete control of your home’s soundscape. Lastly we are a small company and always trying to improve. If you have any ideas, suggestions or feedback, don’t hesitate to reach out… And stay tuned for more blog posts and updates.
Contact us
Email: Support@micro-nova.com
AmpliPro: https://www.amplipro.com/
Micronova: https://www.micro-nova.com/
Our API: https://api.amplipi.com/#overview
Our Github https://github.com/micro-nova/AmpliPi
Our Discourse: https://amplipi.discourse.group/